

How To Set Up Graco Pack N Play Changing Table
Quick Links
Read all instructions BEFORE assembly and USE of product.
KEEP INSTRUCTIONS FOR FUTURE Employ.
See back folio for quick set guide.
Pack 'n Play
Playard
®
Reversible Napper & Changer™Threescore

Besides Meet for Graco Pack'n Play
Related Manuals for Graco Pack'n Play
Summary of Contents for Graco Pack'northward Play
- Page 1 Read all instructions BEFORE associates and Use of product. Go along INSTRUCTIONS FOR FUTURE Utilize. See back page for quick set guide. Pack 'northward Play Playard ® Reversible Napper & Changer™LX...
- Page two Infants tin suffocate • • In gaps between a mattress also small or likewise thick and products sides • On soft bedding. NEVER add a mattress, pillow, comforter or padding. Use Simply mattress pad provided by Graco.
- Folio 3 Avoiding Strangulation • To reduce the chance of SIDS, Hazards pediatricians recommend healthy infants be placed on their backs to • Strings and cords tin can cause sleep, unless otherwise advised by strangulation. Go on strings and your physician. cords abroad from child. •...
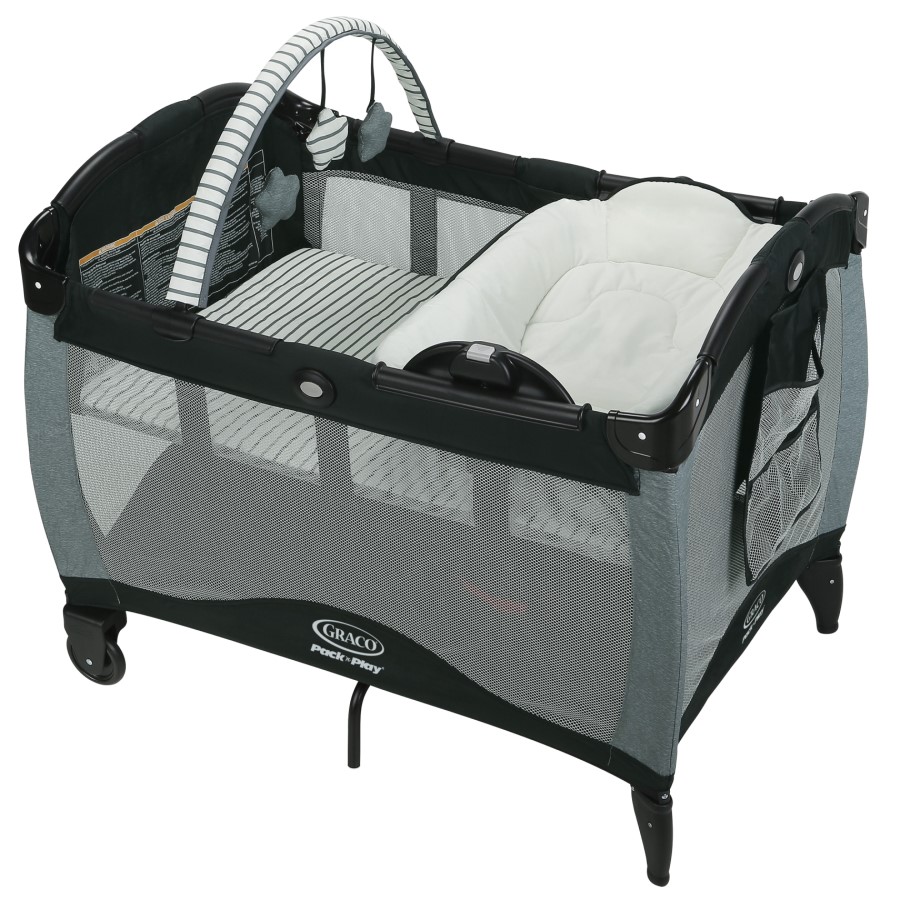
- Folio 4 Parts list This model may not include some features shown beneath. Check that you lot have all the parts for this model Earlier assembling your product. If any parts are missing, call Customer Service. No tools required. ALL MODELS FEATURES ON CERTAIN MODELS...
- Page 5 Playard Setup 1. Disconnect straps holding mattress effectually playard. 2. Remove mattress from around playard. 3. Pull upwardly on side runway in eye above push until all four sides are locked. DO NOT push center down yet. SNAP!
- Page 6 4. When setting upward, lock rails BEFORE lowering center. Be certain pinnacle rails accept get rigid. If not, pull up once more until they are rigid. If top rail do not latch, lift the heart of the flooring higher. CHECK that fabric covers corners.
- Page seven 7. Pull the two hook and loop tabs under mattress/pad through the slotted holes and attach to hook and loop patch on bottom of playard. 8. Pull the four snap straps on corners of playard mattress through bottom of playard. Wrap around the tube and fasten snap onto the tube.
- Folio eight • If a sheet is used with the pad use just the one provided by Graco or one specifically designed to fit the dimensions of the bassinet.
- Page 9 1. You lot will need to remove the mattress/pad from the bottom of the playard to use inside your bassinet. two. Make certain to fasten the bassinet clips to the playard Always printing downwards on the left side of the clip, then the right equally shown.
- Folio 10 three. Insert tapered end of bar into end of other bar with pigsty in it. Repeat with other gear up of bars. Bank check: Tubes MUST be assembled earlier placing mattress/pad in bassinet. 4. Insert the mattress/pad soft side up into the playard, making sure the claw and loop patches on lesser of mattress attaches to matching hook and loop patches...
- Page eleven 4-A To Fold ane. Release snap straps and hook and loop straps on bottom of playard. Pull mattress fully out of playard. DO Non unlock top rail nonetheless. Pull the center of the playard floor up with the tab in the middle of the playard.
- Page 12 three. Center of floor must exist up. a. Elevator up slightly on the top rail. b. Push in on the button located on the side of the acme rail to release the ii tubes. c. Push downwards. d. Repeat on all 4 rails until all tubes are released.
- Page 13 4. Exercise not strength. If unit will not fold, look for a partially latched top rail. Squeeze the latch button to release the track.
- Page 14 4-B To Cover ane. Comprehend unit with handle out. 2. Nothing together.
- Page 15 This model may not include some features shown 5-A Reversible Napper & Changer WARNING Foreclose serious injury or death: follow these warnings and the instructions. NAPPER MODE • You are responsible to provide developed supervision when using your napper. • Napper must be properly fastened to bassinet before use. Fall HAZARD: To prevent falls, stop using the production when infant: •...
- Page 16 Changing Table Manner: Autumn Hazard- To prevent death or serious injury, • E'er stay within arm's reach of your child when using the changing tabular array. Never leave kid unattended. • Employ changing table simply on this playard model. Bank check that it is supported by the playard by pushing downwardly into centre of changing table.
- Page 17 Alert To prevent serious injury or death, Do Non REMOVE Cream. ADVERTENCIA Note: Napper/changer should always exist fastened contrary the wheels.
- Page 18 Irresolute Tabular array Fashion Note: Start assembly with the button housing in this orientation. If non in this orientation, follow steps 1-three. Tube opening i. Press push button and pull upwardly unlock and rotate as shown. 2. Rotate until tube opening is on the bottom, then press down to lock it in place.
- Folio 19 four. Insert the long end of the tube into the button housing as shown. five. The metal push should be facing out when snapped in place as shown. SNAP! 6. With the napper side upward, insert the button housing tube equally shown.
- Page 20 7. Pull upwards on the flap with the 2 straps and insert the tube into the opposite side of the napper/ changer. viii. Insert the push button housing tube as shown. The metal button should be facing out when snapped in place equally shown.
- Page 21 ix. Secure the tubes on both ends of the napper/changer every bit shown. SNAP! 10. Secure the tubes on both ends of the napper/changer every bit shown. SNAP!
- Page 22 xi. Attach napper/changer to the sides of the bassinet every bit shown. Napper/changer should ever be attached opposite the wheels. 12. The tabs on the sides of the napper volition snap in place every bit shown. SNAP! 13. Push downward on the inside of napper/ changer until information technology clicks into place.
- Page 23 Napper Manner ane. Printing push and pull upwards unlock and rotate to the napper side. two. Push downwards on the inside of napper until information technology clicks into place. Check that napper is securely attached by pulling up on it. SNAP!
- Folio 24 Changer Mode Alert Never identify infant face up downwardly on the changing table. Exercise Not print one. Printing push button on housing and pull to unlock and rotate to the changer side. two. Push down on the within of changer until it clicks into place. Bank check that changer is securely attached past pulling up on it.
- Page 25 To Remove Reversible Napper/Changer i. Pull upward on bassinet prune to detach it from the playard. 2. Press button and pull up on napper/changer to release. Echo steps 1- 2 on the opposite side. 3. Remove the napper/changer.
- Folio 26 four. Make sure to fasten the bassinet clips to the playard every bit shown. 5-B Toybar WARNING • Possible entanglement or strangulation injury. Remove toy bar when baby begins to push up on hands and knees. Recommended use from birth to 5 months.
- Folio 27 1. Attach 1 end of toybar into center connector. 2. Insert assembled toybar parts into toybar fabric. three. Attach other finish of toybar to center connector. iv. Attach toy to toybar with claw and loop tape. five. Attach toybar to playard as shown.
- Folio 28 5-C Storage Pocketbook WARNING • Always go on objects out of kid's reach. • Remove the bag when child is able to pull himself upwardly in the Pack 'Northward Play. • NEVER use on within of unit. Child may use every bit a footstep to climb out or reach items in handbag.
- Folio 29 six-A Care and Maintenance FROM TIME TO Fourth dimension CHECK YOUR PLAYARD for worn parts, torn material or stitching. Supplant or repair the parts as needed. Use but Graco® replacement parts. IF PLAYARD IS USED AT THE BEACH, you MUST clean sand off your playard, including the feet, before packing it into cover.
- Folio thirty Quick Fold Guide 1. Pull red tab up to unlock. Cease when y'all hear it click. (See page 2. Lift rail upwardly slightly, printing button and lower rails. Repeat on all 4 sides. (See folio 16) 3. Wrap mattress around play yard. (See Folio 17)
- Page 31 Quick Fix Up Guide SNAP! SNAP! SNAP! SNAP! 1. Pull upwards on all iv sides and snap into place. Exercise non button center of Playard downwardly until elevation rail are locked. (Come across pages viii and 9) 2. Push centre of playard downwards until you lot hear a click.

How To Set Up Graco Pack N Play Changing Table,
Source: https://www.manualslib.com/manual/1209430/Graco-Pack-N-Play.html
Posted by: singliscal.blogspot.com
0 Response to "How To Set Up Graco Pack N Play Changing Table"
Post a Comment